
Handwriting Without Tears Preschool Curriculum Review
Handwriting Without Tears is a handwriting curriculum designed to make it easier for kids to learn to write. This program uses hands-on manipulatives to teach the shapes of the letters which makes it great for kids who are working on their fine motor skills. The program begins with Handwriting Without Tears Preschool and continues with resources up to fifth grade! In this post, I’ll share how we have used the Handwriting Without Tears program in our homeschool, and how to make it work for your family.
I only recommend products that I use and that we love. This post contains affiliate links and I may earn a small commission when you click on the links at no additional cost to you.
What does Handwriting Without Tears Do?
Handwriting without Tears is a handwriting curriculum for kids in preschool through 5th grade. This curriculum uses special handwriting paper with double lines as well as manipulatives to teach writing skills including capital letters, lowercase letters, and cursive writing. The program is designed to make practice fun for kids.
The Handwriting Without Tears curriculum was developed by Jan Olsen, who is an occupational therapist. The activities help kids learn to develop a correct pencil grip, learn proper letter formation, and prevent bad habits through working with manipulatives and learning the letters in a specific sequence.
Each grade level has a student workbook and a teacher’s guide with lesson plans. Each level should take an entire year to complete.
What Font Does Handwriting Without Tears Use?
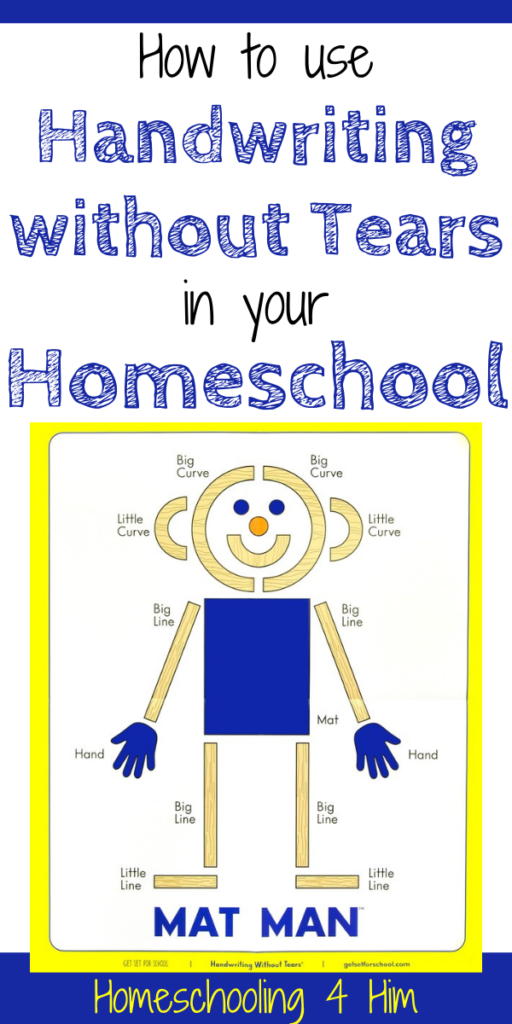
Handwriting without tears uses four basic shapes to make all the letters: big lines, little lines, big curves, and little curves. Kids learn how to combine these four basic shapes to make the letters. Handwriting Without Tears’ font is similar to Zaner-Bloser’s.
Does Handwriting Without Tears use D’Nealian?
D’Nealian handwriting style is more slanted and is designed to help kids get ready to write in cursive. Handwriting Without Tears teaches kids how to write letters in a simple, straight style. This curriculum does not use D’Nealian handwriting and is more similar to the Zaner-Bloser style instead.
Handwriting Without Tears for Homeschool
This program is used both in the classroom setting in public school and by homeschool families who are looking for a strong foundation in handwriting. Homeschool moms should purchase the consumable student book for each child that will be using the program. You might also want to try some of the manipulatives, as they make the curriculum so much more fun!
Handwriting Without Tears does not directly correlate to common core standards, since there are no common core standards for handwriting. However, the curriculum correlates to some state and national standards in language arts.
Handwriting Without Tears is also frequently used for occupational therapy, for kids who struggle with fine motor delays.
Handwriting Without Tears Preschool
The program is based on this workbook:


The workbook starts with some pages about colors, numbers, and shapes that are great for reviewing how to hold a crayon. Then, the book covers the uppercase letters one by one.
Instead of going through new letters alphabetically, the letters are organized by how they are formed. This was a total game-changer for us and made it so much easier! Each page shows how to form the letter, has some to trace for practice, and includes a picture to color:

The workbook can stand on its own, but if you are new to Handwriting Without Tears, the Teacher’s Guide can be a really helpful resource as well. It does a good job of explaining how to teach the concepts in the workbook (since the workbook itself doesn’t come with directions).
It also explains how to use the manipulatives in the lessons, which is what really makes Handwriting Without Tears unique.


Manipulatives for Handwriting Without Tears
When we used this program we got some of the manipulatives as well, and my son enjoyed using them. I love that Handwriting Without Tears uses a multi-sensory approach to help kids remember what they are learning. There are SO many choices available for this program, and the full kit is awesome but expensive. Our favorites were:


Wood Pieces for Capital Letters
This set came with a bunch of pieces in each of the four sizes: Large line, small line, large curve, and small curve. The book shows how almost all the letters can be made by combining these shapes. Building the letters with the wood pieces first was a great introduction to the shapes of the letters, and the order of the strokes.
Letter Cards for Wood Pieces
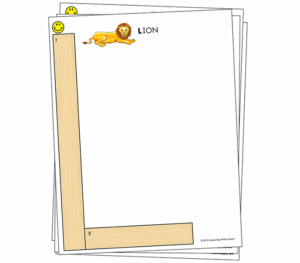
This is a set of laminated capital letter cards that can be used as mats to build letters with the wood pieces. The wood pieces will fit on top of the shapes exactly so kids can practice building the letters on their own.
The pieces on the mats are numbered so kids know which piece to add first, second, and third. And, each card has a smiley face in the top left corner to remind students to start their letters at the top.

Mat Man Hands
Building Mat Man was my son’s FAVORITE part of Handwriting Without Tears! This set showed us how to use the wood pieces to make a person and the accompanying song, when combined with the sensory activities, helped my son remember to draw all the right body parts. After just a few times of going through the Mat Man lessons together, he was able to draw a person!


Stamp and See Screen
This is a mini version of the magnetic drawing boards that were super popular when I was a kid, that came with a set of 4 wood magnets (Big curve, small curve, big line, small line). Kids can use the magnets to form the shape of the letter, and then use their stamps as visual cues to trace over the letter with the magnetic pencil to practice drawing it. This was a really fun hands-on way to practice making the letters.


Roll a Dough Letters
This is an add-on set for the Stamp and See Screen. It came with a set of laminated cards that could be placed on top of the Stamp and See Screen that showed the shapes of the letters. An arrow on each card shows where to start when forming the letter.
The set also came with a can of play dough that could be used to form the letters. This set is great because playdough is an excellent way to build up fine motor muscles, plus it keeps kids practicing those letter shapes.


Slate Chalkboard
The chalk board is one of the most important manipulatives in Handwriting without Tears. Kids use this little chalkboard to learn how to write new letters. First, the teacher draws the letter on the chalkboard using a piece of chalk. Then, kids use wet sponge cubes to wash off the board in the shape of the letter, and a paper towel to dry it. Finally, they get a piece of chalk and try to make the letter themselves.
Handwriting Without Tears has also developed a wet-dry-try app that lets kids practice their letters without using the chalkboard. The app is available for Apple devices in the app store.
This program was a great fit for my very active 4-year-old because it held his attention and gave us a variety of different ways to practice the same letters. I loved the hands-on manipulatives because they made learning fun for him- and easier for me!
Handwriting Without Tears for Older Children
This handwriting program is available for kids from preschool through 5th grade.
Kindergarten
Students in Grade K have two options for using Handwriting Without Tears.


Kick Start Kindergarten is a book for young kindergarteners who need a little bit of extra practice with their letters. This kindergarten-level book introduces both capital and lower case letters. It uses fun activities and mnemonics like Frog Jump Capitals to help kids remember how to form their letters correctly.


Letters and Numbers for Me is a more advanced first school book for kindergarten. Kids will learn to form the letters and practice writing simple words as well.
First Grade


My Printing Book reinforces capital and lowercase letters for kids in 1st grade. This is a great way to help kids practice the correct use of lowercase letters. The Printing Book teacher’s guide includes tips for teaching lessons to your first grader.
Second Grade


The 2nd grade student book is called Cursive Kickoff and is an introduction to cursive lessons for young children. The book teaches lowercase cursive letters, and the cursive handwriting teacher’s guide gives tips for teaching cursive to your child.


Students in 2nd grade can also choose Printing Power, which is a more advanced printing book for kids who aren’t quite ready to learn cursive in 2nd grade. A Printing Power Teacher’s guide is also available.
Third Grade


The 3rd grade student book is called Cursive Handwriting. It will teach your 3rd grader the cursive letters step by step and helps kids learn to join individual letters into words.
Fourth Grade


The 4th grade student book is called Cursive Success. This book includes language arts lessons and helps reinforce the correct use of cursive writing for older students. A cursive success teacher’s guide is also available.
Fifth Grade


The 5th grade student book is called Can-Do Cursive. This last book in the handwriting system provides even more practice in cursive for older students.
Learn More about How to Improve your Child’s Handwriting!
These 5 Simple Tips to Improve Handwriting for Children will help you figure out the next steps to helping your child improve.
These Handwriting Without Tears Practice Sheets are the perfect resource to get started. Download the free PDF for handwriting in your homeschool!
You Might Also Like…
Transportation Multi-Level Handwriting Pack

Perfect for multiple ages!
Make handwriting fun and easy with this 60+ page transportation-themed pack! 3 different levels are included so kids of all ages can work together. This pack includes 2 line handwriting pages so it is compatible with the Handwriting Without Tears curriculum. No prep is required- just print and go!


I have heard great things about this program. This review helps me to understand why. Thanks!
I love the idea of rolling dough to make the letters! What a great idea to shake up the practice of writing by hand over and over!
Aw, I love the wood pieces. These are too cute and a really brilliant idea.
I think those wood pieces are my favorite. I’m teaching my daughter now how to write and it can be super frustrating at times but I think those pieces would make it so much fun for her.
What a great program to learn how to write! I will check it out for my daughter who is learning her alphabet right now.
Hi Stephanie! Yes, we love it! Some of the activities might be helpful for reinforcing the letter names too!
Hi Loren! I’m glad it helped!
Hi Samantha! I’m sorry it’s frustrating! I had a lot of frustrating moments with my son at first too. Mixing in the hands on activities was what really helped us make handwriting more fun. I hope it helps for you too!
Hi Tasha! Yes, and it’s great to build those fine motor muscles too!
Hi Iris! I agree! My son loves building shapes and letters with them!
I love this! My kids loved tracing all the letters when they were little!
Hi Norma! Yes, learning letters is a lot of fun when it’s hands-on!
What a great program for letter learning. I love that the kids can touch and manipulate blocks and other things into letters.
Hi Alison! Yes, the manipulatives really help them learn!
Those wood pieces are such a brilliant idea.. I know they will make learning letters so much more fun.. will share with family and friends with younger kiddos (mine are teens now!)
Will check out this program for my daughter. I want her to learn writing very well from home.
Hi Sonia! It’s a great program! Let me know if you have questions I can help with.
Hi Vidya! Hope it helps them!